District Settings Tab
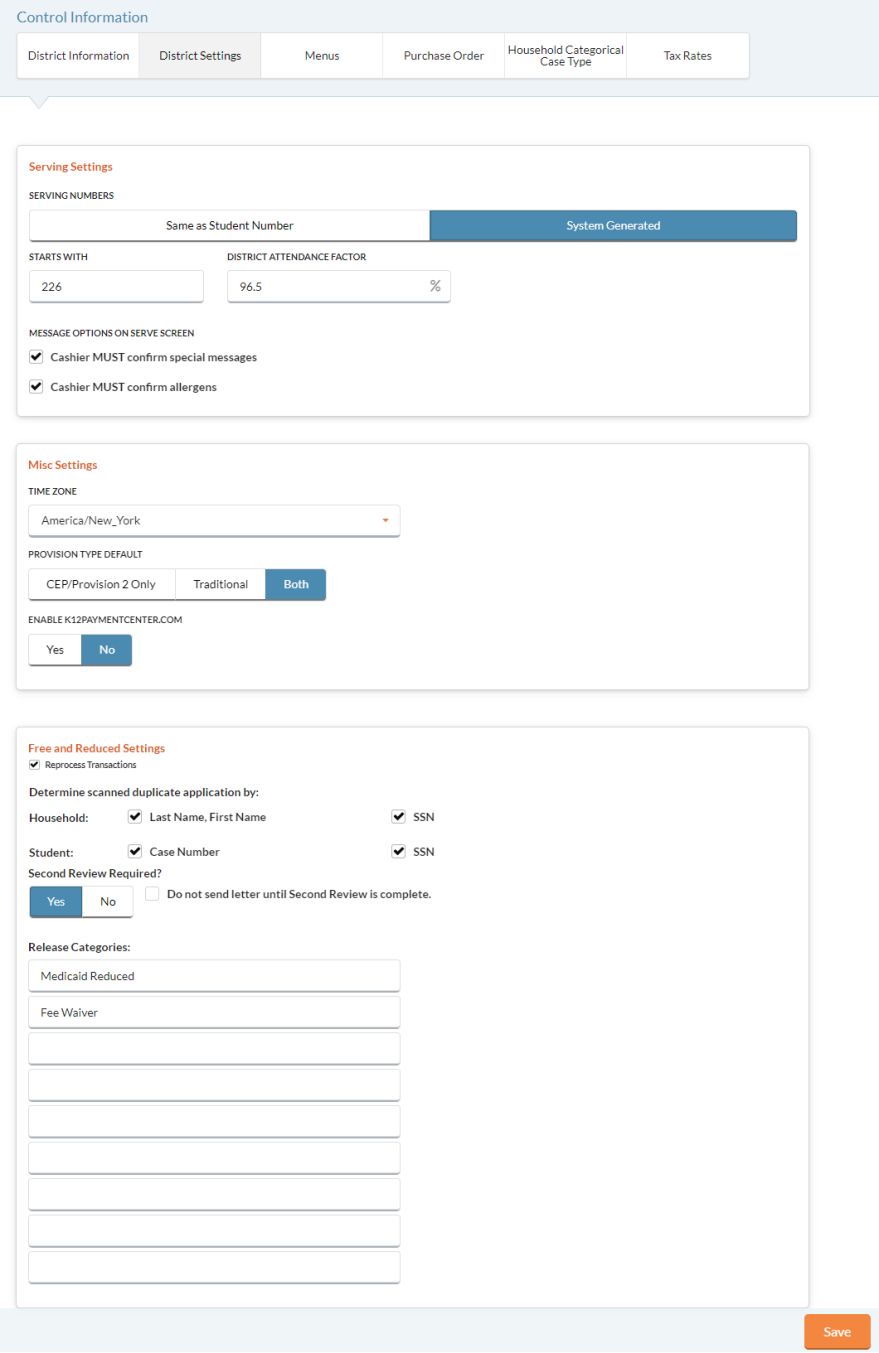
This tab has three sections: Serving Settings, Misc Settings and Free and Reduced Settings.
Serving Settings Section
Serving Numbers
This is the number that is used to identify a student as they come through the serving line in Point of Sale (POS). Every student in the district must have a unique number. It can be the same as the Student Number or a different number.
This setting cannot be changed after students have been added.
-
Click Same as Student Number if you would like to use the Student Number as the Serving Number when students are imported.
-
Click System Generated if you would like the system to assign a unique Serving Number for each student. Enter the number you want to start with. The minimum starting number is 101.

- Enter your district’s attendance factor here in the District Attendance Factor text field.
- This is a percentage that is calculated by dividing the average daily attendance (ADA) by the total membership. The attendance factor should be calculated at least once each school year but may be calculated more frequently. Please contact your state agency if you have questions about the calculation.
- If entered here, the District Attendance Factor will applied district-wide but can be edited at the site level.
- This attendance factor will used as the default value on the Daily Deposit Reconciliation for calculating the Accuclaim Edit report however, you can change the District Attendance Factor on the Daily Deposit form if you need to.
- Check the Cashiers MUST confirm special messages box to display a confirmation box on the serving screen if the student has a special message.
- Check the Cashiers MUST confirm allergens box if the cashier needs to confirm the allergens before completing the sale for students with assigned allergens.
Misc Settings
The Misc Settings section is where users can select the district's Time Zone, Provision Type Default for reporting purposes, and enable K12PaymentCenter, if applicable.
The Provision Type Default sets your default preference for the following reports:
- Status Change
- Master Roster
- Demographics
- Transfer/Withdrawn
- Meal Benefit Expiration

Select Your Time Zone
- Select a Time Zone from the dropdown list; default is the America/ New York time zone. This time and date will display on district reports.
Select the Time Zone your district computer is in; this could be different than the Time Zone your server is in. Example: Your district computer serving lunches is in Guam, but your server is managed in Atlanta, Georgia. Your selected time would be: (ChSt 1000) Pacific/Guam.
Report Settings
-
Select CEP/Provision 2 Only,Traditional or Both from the Provision Type section.
-
CEP/Provision 2 Only means CEP and Provisional Non-Base Year
-
Traditional means Provisional Base Year
-
Both means CEP and Provisional Non-Base and Base Years
- When creating reports, the report will only yield results based on the setting here.
-
Enable K12PaymentCenter
- If you are using K12PaymentCenter.com, check the Enable K12PaymentCenter.com box. You do not need to set a schedule for the K12PaymentCenter service.
- It automatically runs the K12PaymentCenter updates every 30 minutes around the clock.
- K12PaymentCenter (K12) updates include: Exporting Students to K12, Exporting POS Transaction History to K12, Updating POS Balances from K12, and Verifying Students in K12.
Free and Reduced Settings
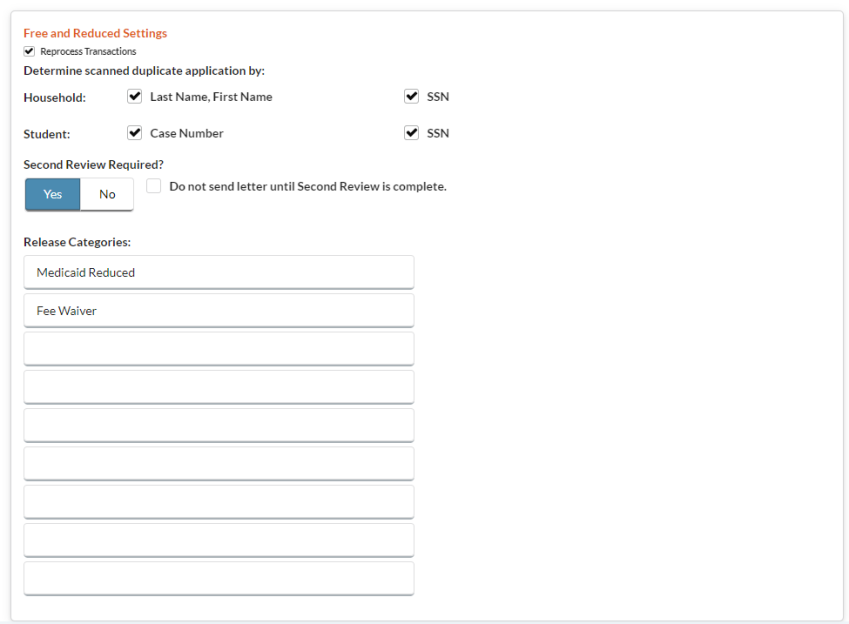
The Free and Reduced Settings section is where users determine scanned application duplicates, set up Second Review and enter Release Categories.
- Duplicate Student Numbers will always require review.
- Scanned duplicates will need to be reviewed in order to finish processing.
-
Check the Reprocess Transaction box if you want your district to be able to Reprocess Transactions. For more information about the utility and how it works click here.
- Check the boxes for Household Last Name, First Name and/or SSN, and/or Student Case Number and/or SSN to determine duplicate scanned applications if you would like to add this additional criteria to the duplicate review process.
-
Select Yes or No for Second Review Required. This tells the system whether a second review is required on applications.
-
If Yes is selected, a Do not send letter until Second Review is complete checkbox will appear.
-
If checked, any student notification letters will not become available to print/email until Second Review is complete.
-
-
Release Categories
This section is optional. It can be used if your application form has a place where the family can give permission to release information to outside agencies.
- To use this feature, assign a number to each agency that corresponds to your application forms (for example, 1=Health Dept, 2=Dental Care). The system allows up to nine different release categories.
- As applications are processed, mark the Release Categories that apply for each application in the Release Info section of the Household form. Then you will be able to Filter by Release Category when you print rosters.
- Click
 when complete.
